Usage Based Billing Models
Schematic enables you to implement usage-based billing models quickly, and enforce any associated limits within your product as your customers reach them using Schematic’s feature management capabilities.
For instance if you have a pay in advance model, when a customer reaches the credit limit, you can prevent them from using more.
While base charges (e.g. a subscription fee) are defined at the plan level, as described here, usage-based billing is defined at the individual entitlement level.
What is usage based billing?
Usage-based billing is a pricing model where customers are charged based on their usage of a particular feature. This model is useful for businesses offering variable or consumption-based products, such as APIs, cloud services, or subscription tiers with metered features.
Supported Billing Models
Schematic supports a number of usage-based models. If the one you care about is missing, please send us a note at hi@schematichq.com.
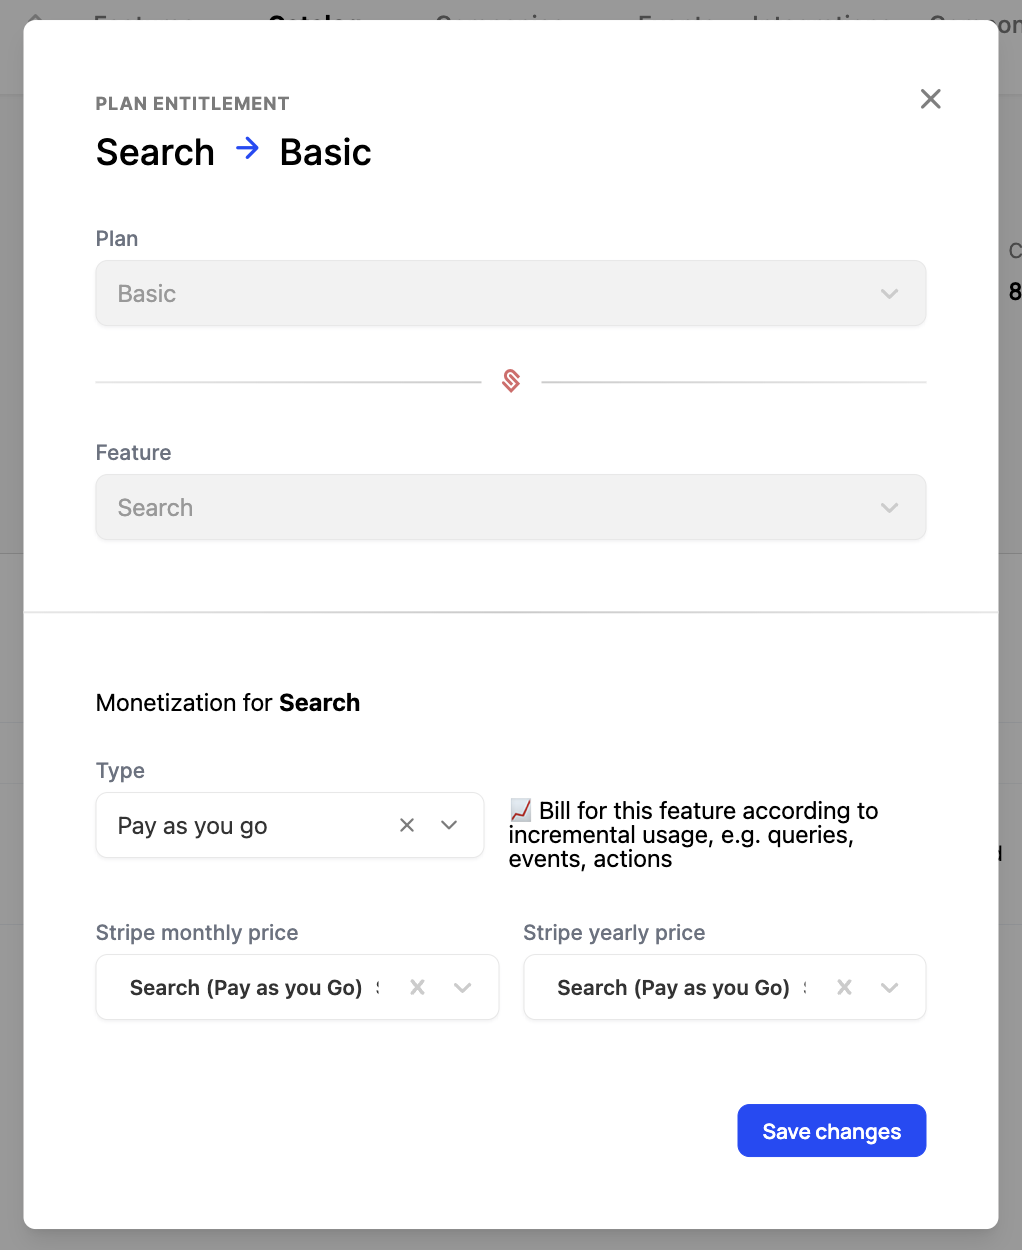
Pay as you go
Charge customers based on their usage of a feature without a preset fee or limit.
This is ideal for event-based features in Schematic such API calls or SMS usage.
Configuring pay as you go
- Navigate to a plan with a metered entitlement.
- Click on the entitlement that you’d like to monetize.
- Select “Pay as you go” and the corresponding product from Stripe to aggregate usage against.
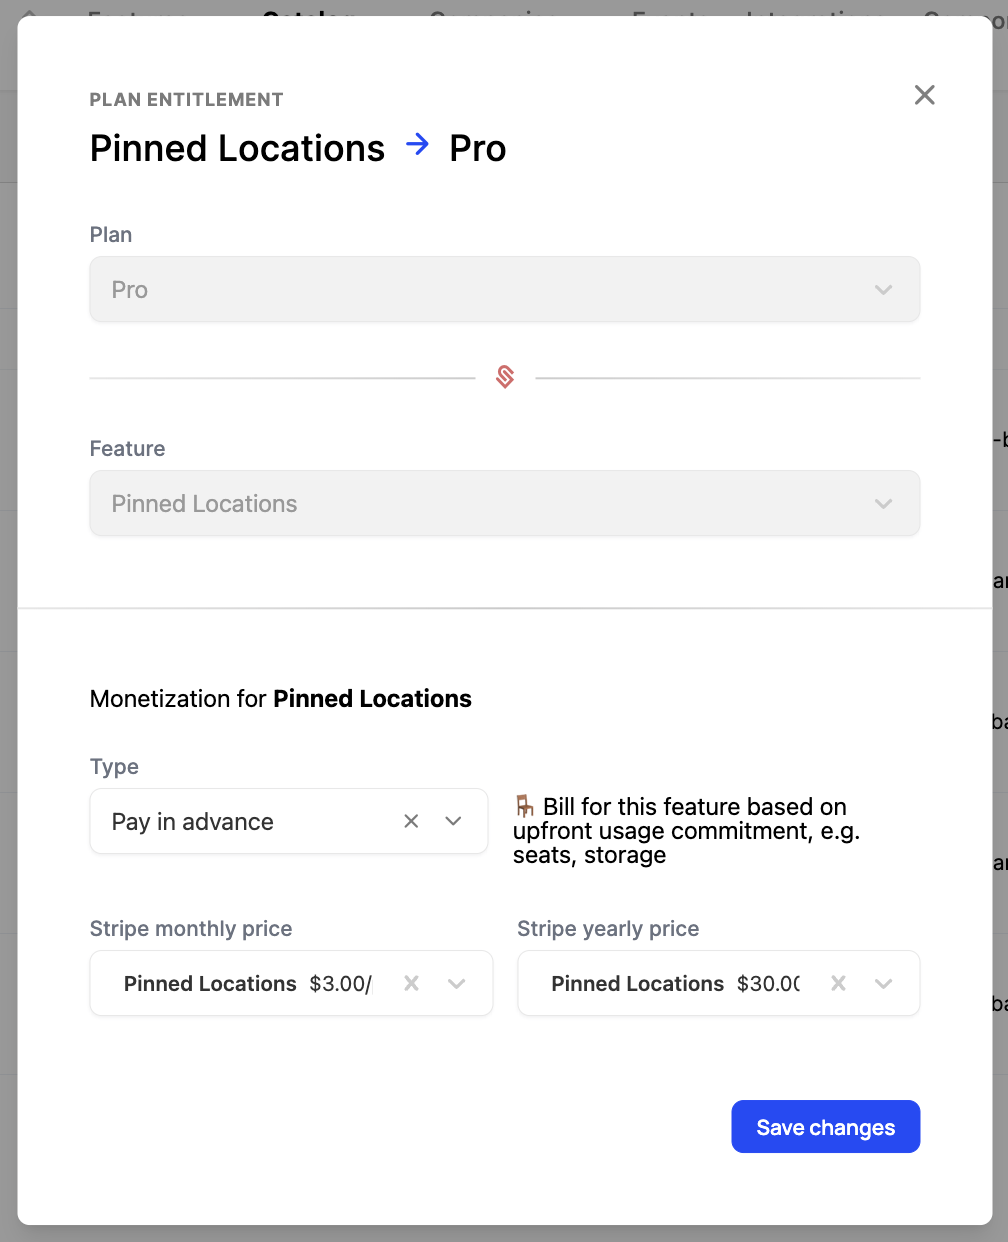
Pay in advance
Charge customers up front for pre-defined usage.
This is ideal for scenarios where customers prefer buying usage in pre-determined chunks, and is supported for trait-based features in Schematic such as Seats or Projects.
Configuring pay in advance
- Navigate to a plan with a metered entitlement.
- Click on the entitlement that you’d like to monetize.
- Select “Pay in advance” and the corresponding product from Stripe to aggregate usage against.
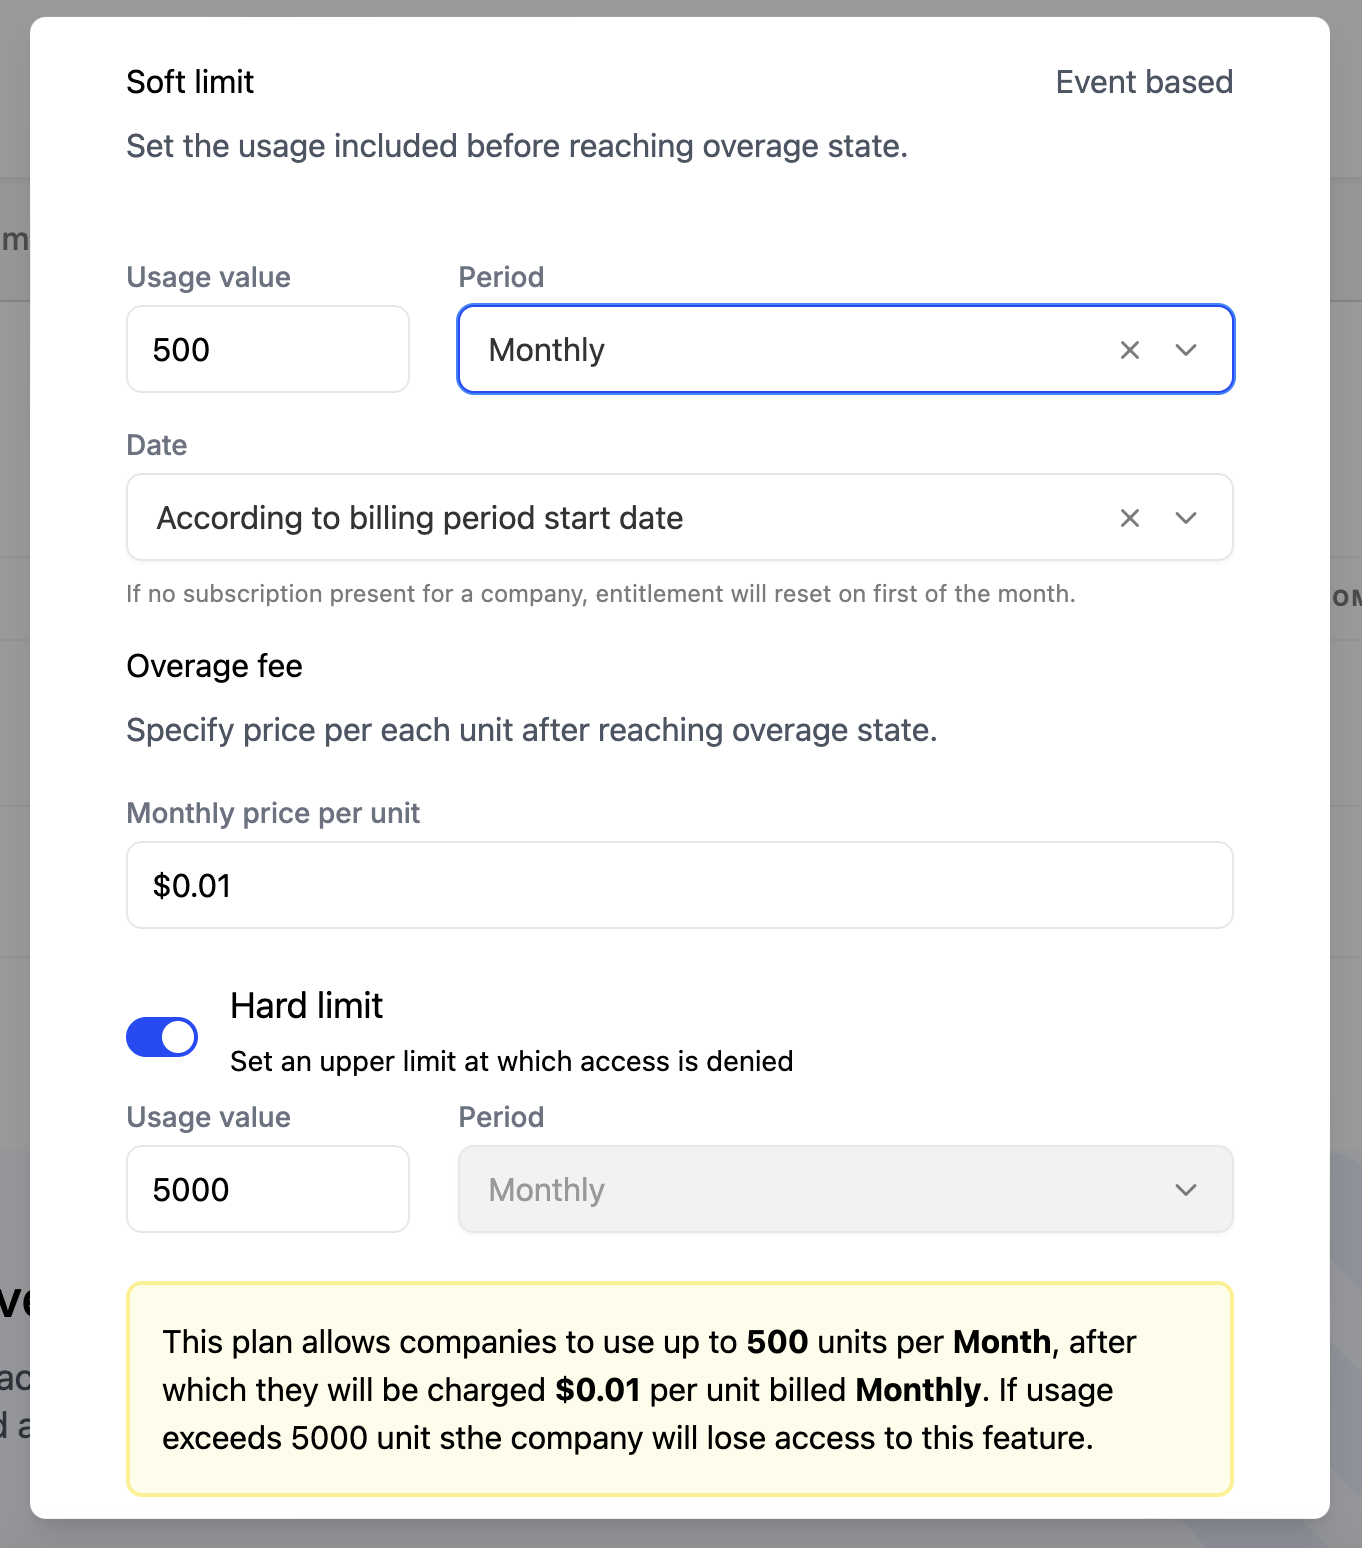
Fixed fee with overage
Include some amount of usage for a fixed fee, and then charge customers for any additional usage.
This is ideal for scenarios where many customers will fall into the plan’s quota, but you want to allow (and benefit from) customers with heavy usage.
Configuring fixed fee with overage
- Navigate to a plan with a metered entitlement.
- Click on the entitlement that you’d like to monetize.
- For Type, select “Overage”
- You can either choose to have Schematic create the product in Stripe for you, or use one already created in Stripe. (If you’re not sure, we recommend letting Schematic create the product for you.)

- The Soft Limit represents the amount of usage included in the plan. Below this is set to 500, which means the first 500 fast requests are included.
- Next, select the duration of the period to track usage. Monthly is by far the most common, and Schematic also supports daily and yearly.
- If monthly is selected (as is done here), you will need to determine if the period should reset at the beginning of the month or based off of the billing period of the subscription (e.g. if the customer signed up on the 15th, the period would be measured 15th-14th of next month). Basing it off of the billing period is the most common choice.
- The Overage price is the amount to charge for each unit of usage over the soft limit. Here, we set that to $.01 (1 cent) per usage.
- Finally, you can optionally configure a Hard Limit (here 5,000) — this represents the maximum amount of usage, at which Schematic will always turn off the flag. Hard Limits can be helpful if there are global resource limits you’re trying to manage or you want to force conversion into a higher plan at a specific usage threshold.
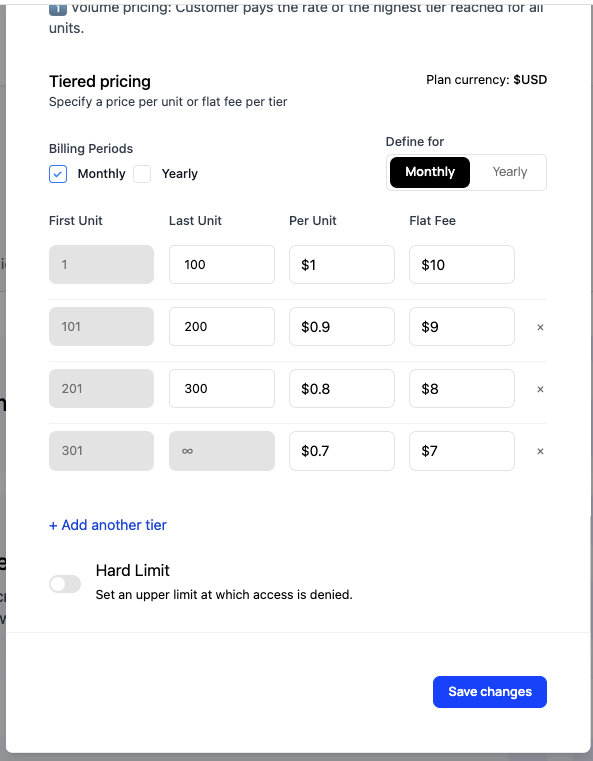
Volume pricing
Volume pricing is a common way to provide discounts for large usage. In volume pricing, usage tiers are defined, and the final price paid is based on the usage tier the customer falls into.
Schematic allows you to define the price of each tier as a fixed amount, a per-unit price, or a combination of the two.
For example. If pricing tiers are defined as follows:
A customer who uses 150 units would be charged $144 ($9 + 150*$0.90). Notice how only the final tier the customer fell into (101-200) determines the price. This can lead to sharp changes in price around usage cutoffs.
Configuring volume pricing
- Navigate to a plan with a metered entitlement.
- Click on the entitlement that you’d like to monetize.
- For Type, select “Tiered”.
- Then, a second Type option will appear below and select “Volume”.

- You can then configure the tiers for the volume pricing. To add a new tier, click the ”+ Add another tier” button below the table.
- The configuration for our example is shown in the screenshot below.
- When you’re done, click “Save changes” to save your changes.
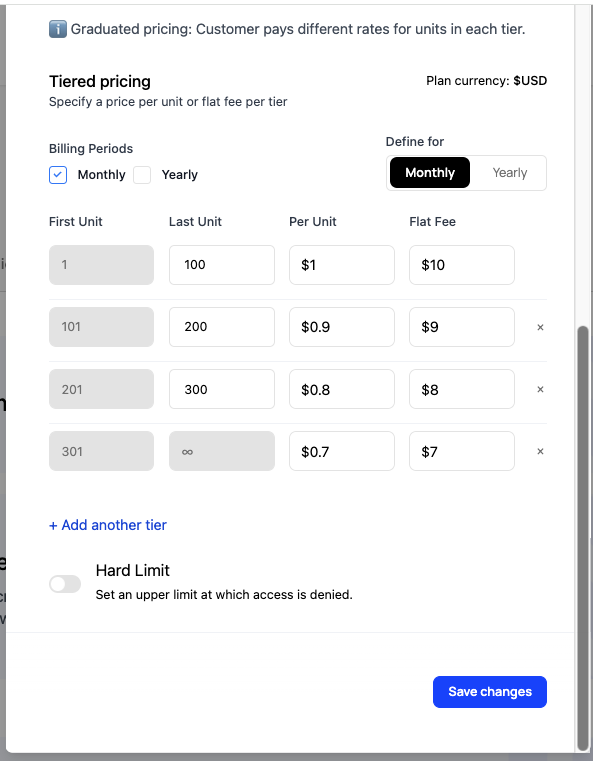
Graduated pricing
Graduated pricing is another way to provide discounts for large usage. In graduated pricing, usage tiers are defined, and the price per unit changes as the customer moves through the tiers. In this model, units used earlier in a billing period often cost more than those used later, leading to a more gradual volume discount. The final blended per-unit price cannot be determined until the end of the billing period.
Schematic allows you to define the price of each tier as a fixed amount, a per-unit price, or a combination of the two.
For example. If pricing tiers are defined as follows:
A customer who uses 150 units would be charged $164 ($10 + 100*$1 + $9 + 50*$0.90). Notice how the first 100 units are charged at $1, while the next 50 units are charged at $0.90.
Because the customer had usage in 2 different tiers, they paid the flat fee price for both tiers. This is typically not the desired behavior, which is why flat fee pricng is not common in graduated pricing models. If you want to include a flat fee, consider adding it to the base plan price, or only including it in the first tier.
Configuring graduated pricing
- Navigate to a plan with a metered entitlement.
- Click on the entitlement that you’d like to monetize.
- For Type, select “Tiered”.
- Then, a second “Tyonpe” option will appear below and select “Graduated”.

- You can then configure the tiers for the graduated pricing. To add a new tier, click the ”+ Add another tier” button below the table.
- The configuration for our example is shown in the screenshot below.
- When you’re done, click “Save changes” to save your changes.
Credit burndown
Checkout our Credit Burndown Docs.
Negative Quantities (Usage Adjustments)
Schematic supports submitting track events with negative quantities to reduce usage, for use cases such as refunds, corrections, or reversals. Negative quantity events must be submitted using a secret API key — publishable API keys will reject them.
As an alternative to sending negative values for adjustment, usage events can be backdated. If trusted_client_clock is true, clients can set their own value for sent_at. See Backfills and usage corrections.
How to submit a negative quantity event
Include a negative integer for the quantity field in your track event. The quantity must be a non-zero integer (fractional values are not supported).
Behavior by billing model
Negative quantities affect billing differently depending on the pricing model configured for the feature’s entitlement:
For Stripe-integrated billing models (pay as you go, tiered, overage), Stripe enforces that the net usage for a billing period cannot be negative. If negative events would push the period total below zero, the excess adjustment is effectively ignored by Stripe. Plan accordingly when issuing refund events.